
When people search first aid kit essentials, they usually want one of two things.
They either want reassurance they’re not missing something important, or they’re about to buy supplies and they don’t want to waste money on items that will sit unused (or expire). That’s a smart instinct.
A good kit isn’t the biggest kit. It’s the kit you can reach fast, use confidently, and keep stocked without turning it into a recurring expense.
A simple way to build a kit without overbuying
Here’s the mindset shift that helps most: build for likely problems first, rare problems second. Your goal is useful readiness, not a mini hospital.
Step 1: Match supplies to risks
Instead of shopping by “what people say you should have,” shop by what’s most likely in each setting (home, car, workplace). Think in categories, not endless items.
A quick filter that works:
- Cuts/scrapes (the most common)
- Minor burns
- Sprains/strains
- Eye irritation (especially in workplaces)
- Bigger bleeding (rare, but high impact)
That’s enough to guide smart choices without spiraling into “what if” shopping.
Step 2: Plan for response time
Your kit should change based on how quickly help arrives.
If you live close to urgent care, your home kit can stay lean. If you drive long rural routes, your car kit should handle delays. If your workplace is large or spread out, you need supplies that can support more than one person.
A practical rule:
- Short help time: focus on cleaning, covering, comfort, and basic support.
- Longer help time: add protection (gloves), warmth, and stronger bleeding control.
Step 3: Choose a container that protects your gear
The container is underrated. It’s what prevents crushed packaging, moisture damage, and lost items.
Look for:
- Clear compartments or pouches
- A label you can spot fast
- A durable shell for car/work use
- A place to store basic instructions

What should be in a first aid kit
You don’t need an item-by-item mega list to build a strong kit. What you do need is a reliable “core” that covers the most common problems.
The “core” categories that matter most
Think of your essentials as a small set of roles:
- Barrier protection (gloves, breathing barrier if trained)
- Cleaning (wipes/solution for skin, hand sanitizer)
- Covering wounds (assorted dressings and gauze)
- Securing dressings (tape or wraps)
- Tools (scissors, tweezers)
- Support (cold pack, elastic wrap)
- Instructions + emergency contacts
The American Red Cross outlines typical kit contents in a way that helps you sanity-check your setup without pushing products.
What to skip when you’re trying not to overbuy
A lot of overbuying happens here. If you’re trying to keep it practical, skip:
- Duplicates you already have in abundance (like 10 types of tiny bandages)
- Items you don’t know how to use (unless you plan to train)
- “One-time gadgets” that take space but rarely help
If you’re unsure, buy smaller quantities first. You can always add later based on real use.
Home kit: ready for daily life
Home is where you’ll use a kit most often, but it’s also where supplies get borrowed and never replaced.
Keep it built for normal life: kitchen cuts, small burns, minor sprains, and kid-related bumps if that applies.
Two quick home wins:
- Store it where injuries actually happen (often the kitchen), not buried in a closet.
- Keep a second mini kit for bathrooms or upstairs so you’re not running around when someone’s bleeding.
Where to store it for real-life speed
Pick one “main” location that everyone in the house knows. If it’s a family home, tell the kids where it is, too.
Good spots:
- Kitchen cabinet (easy access)
- Mudroom near the door
- A labeled drawer that isn’t crowded
Two smart add-ons most homes forget
Instead of adding more bandages, add things that prevent scramble:
- A small card with emergency contacts and any key medical notes
- A simple “restock reminder” slip inside the lid (more on that below)
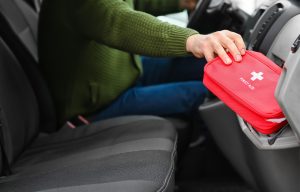
Car kit: built for delays, heat, and surprises
Car kits fail for one big reason: they’re built like home kits. But vehicles introduce two unique problems—time and temperature.
Heat-proofing your supplies
A hot trunk can break down adhesives, damage packaging, and shorten shelf life. Treat your car kit like a piece of safety equipment, not a storage bin.
Do this instead:
- Store it out of direct sun when possible
- Use a sturdier container that won’t crush supplies
- Replace compromised packaging immediately (if it’s melted, split, or sticky)
The “stuck on the road” reality check
A car kit isn’t only about first aid. It’s also about staying safe until help arrives.
Ready.gov’s “Build a Kit” guidance is useful here because it frames preparedness beyond just medical supplies—think light, warmth, basic tools, and communication. That broader view makes your car kit more realistic.
A simple way to keep it practical:
- Pair your first aid items with a few “stay safe” basics (light, blanket, visibility)
- Keep it compact enough that you’ll actually leave it in the car year-round
Workplace kit: practical, shared, and easy to maintain
Workplace first aid is different because it’s not just “your kit.” It’s a shared resource that needs to be clear, organized, and easy for multiple people to use.
Think “multiple users,” not “perfect kit”
The most common workplace failure isn’t missing a rare item. It’s that supplies are scattered, unlabeled, or used up and never replaced.
Design for speed:
- Put the most-used items front and center
- Use clear sections (wound care, wraps, tools)
- Add a simple restock note for whoever checks it
OSHA guidance and why it matters
OSHA requires first aid supplies to be readily available in workplaces, and it provides a non-mandatory appendix describing example minimal contents based on ANSI guidance. That’s helpful because it points employers toward a structured baseline instead of guesswork.
This doesn’t mean every workplace uses the same kit. Your needs change based on hazards, staff size, and response time. But using OSHA’s guidance as a reference can help you justify a practical starting point—especially if you’re the person tasked with “making sure we’re covered.”
Maintenance that doesn’t feel like a chore
This is where most kits fall apart: they get built once, then slowly become a box of half-used supplies.
You don’t need a complex system. You need a habit that’s hard to ignore.
A restock rhythm you’ll actually stick to
Pick one trigger and keep it consistent:
- First of every month
- Daylight savings time
- The first workday of each quarter
Then do three fast checks:
- Used items: replace what’s missing
- Damaged packaging: toss anything opened or compromised
- Expirations: replace what’s outdated (especially sterile items)
That’s it. Five minutes.
Expiration dates, sterile packaging, and when to replace
Not everything “expires” the same way. The big concerns are:
- Sterility (anything meant to stay sealed and clean)
- Adhesives drying out or melting
- Wipes/solutions losing effectiveness
If an item looks questionable, don’t debate it. Replace it.
upgrade supplies without guessing
If your kit is missing basics, looks messy, or hasn’t been checked in a while, it’s probably time for a simple refresh.
To browse supplies by category and build only what you need, start here: First aid supplies and kits.
If you’re unsure what fits your home, vehicle, or workplace setup, reach out and ask a quick question: Contact CPR Depot USA.
Helpful resources to keep learning
If you want to go one step beyond “bandages in a box,” these references are worth your time:
- Ready.gov’s guide to building an emergency kit for several days of self-sufficiency
- American Red Cross guidance on first aid kit contents and upkeep
- OSHA’s example guidance for workplace first aid kit contents and availability
FAQs
1) How often should I replace first aid kit supplies?
Check your kit on a simple schedule (monthly or quarterly). Replace anything used, opened, damaged, or expired—especially sterile wound dressings and wipes.
2) Do I need separate kits for home, car, and work?
Usually, yes. The best approach is a shared core plus a few setting-specific additions based on risk and response time.
3) What’s the biggest mistake people make with first aid kits?
Buying too much at once, then never maintaining it. A smaller kit you restock is more useful than a packed kit you can’t rely on.
4) Are workplace first aid kit contents legally required?
OSHA requires first aid supplies to be readily available and provides example guidance referencing ANSI-based contents for small worksites. Requirements can vary by workplace risk.
5) What’s the best way to avoid overbuying?
Start with the essentials that solve the most common problems (wounds, minor burns, sprains), then add only what your setting and training support.