

Emergency medical training relies heavily on visual and physical cues. When a nursing student or paramedic walks into a scenario, a clean manikin on a gurney does not trigger the same rapid response as an active trauma patient. Adding realistic injuries through medical moulage bridge that gap. By applying mock burns, lacerations, and hemorrhages, educators transform basic drills into high impact sensory experiences.
Using proper trauma simulation supplies allows healthcare programs to build authentic scenarios without exceeding operational budgets. This guide breaks down simple methods to design believable trauma drills, protect your expensive lab gear, and maximize learning outcomes.
Why Realistic Trauma Simulation Matters for Clinical Learning
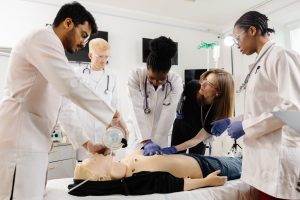
Nursing assessment depends on sensory perception. Learners must see, feel, and evaluate physical signs under pressure. Visual cues like active arterial spurts, blistering burns, or deep puncture wounds force students to prioritize care immediately rather than waiting for an instructor to read clinical vital signs aloud.
High fidelity scenarios help students build muscle memory and emotional resilience. Experiencing simulated stress in a controlled setting reduces anxiety when learners encounter real trauma in clinical rotations. By using quality supplies, educators create safe spaces where critical errors become valuable learning moments without risking patient safety.
Key Challenges in Building Trauma Scenarios
Running a busy clinical simulation center comes with daily operational friction. Educators must balance high learning standards with strict administrative constraints.
Managing Tight Budgets and High Equipment Costs
Procurement budgets are constantly squeezed. Commercial moulage kits and specialized prosthetics can seem expensive when purchased repeatedly. Many programs struggle to maintain an adequate inventory of single use supplies for large student cohorts.
Eliminating Setup Bottlenecks Between Class Sessions
Lab coordinators often have less than 20 minutes between student groups. Building intricate makeup effects from scratch for every session is not realistic. Complex application processes slow down class rotations and limit hands-on practice time for students.
Protecting High Fidelity Manikins from Stains and Damage
High fidelity simulators cost tens of thousands of dollars. Using unapproved stage blood, food dyes, or harsh adhesives can permanently stain silicone skin or corrode internal fluid tubing. Preventing permanent damage is a top priority for every lab manager.
Essential Trauma Simulation Supplies for Beginners
Building an effective starter kit does not require hundreds of specialized products. Focus on versatile tools that offer high visual impact with minimal preparation.
Here is the plain text version formatted so you can highlight, copy, and paste it straight into your blog post text editor:
Essential Moulage Supplies Checklist
- Reusable Silicone Overlays: Flash moulage options for fast application.
- Non-Staining Simulated Blood Concentrate: Safe for internal fluid systems and manikin skin.
- Barrier Gels & Protective Sealants: Essential for preventing permanent stains on equipment.
- Medical-Grade Adhesives: Spirit gum or skin-safe silicone glues.
- Neutral Setting Powders & Isopropyl Alcohol: For removing shine, blending edges, and quick cleanup.
Pre Made Prosthetics vs On the Spot Application
Beginners often start with wax and liquid latex to build custom wounds. While these materials allow total creative freedom, they take significant time to apply and clean. Pre-made silicone overlays offer a durable, time saving alternative.
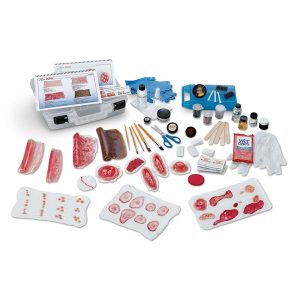
For comprehensive clinical scenarios, complete sets provide an all in one solution. The Life/Form Ultra Nursing Wound Simulation Kit includes a wide variety of simulated wounds, makeup, and accessories in a hard carry case. These kits allow educators to add detailed surgical incisions, pressure ulcers, and lacerations instantly.
Safe Formulas for Simulated Blood and Fluids
Not all fake blood is safe for clinical simulators. Standard theatrical blood often contains red dyes that bond permanently to manikin plastics. Look for specialized blood concentrates designed for simulator internal fluid systems.
These formulas wash away easily with warm water and mild soap, leaving no residue behind. Using purpose built fluids keeps internal pumps flowing smoothly without clogging sensitive valves.
How to Apply Basic Wound Simulation for Nursing Labs
Applying wound simulation for nursing scenarios should be systematic and repeatable. Follow these three steps for rapid application.
Step 1 Clean and Prepare the Application Surface
Ensure the manikin skin or actor skin is completely dry and free of oils. Apply a thin layer of barrier spray or gel over the target area. This protective layer prevents pigments from leaching into porous manikin materials and makes post-scenario cleanup fast.
Step 2 Secure the Prosthetic or Overlay
Position the prosthetic over the designated anatomical site. For modular systems, attach the overlay securely using integrated straps or skin safe adhesives.
For advanced ALS training, the SMART STAT Trauma Overlay Flash Moulage links directly into existing internal bleeding systems. This allows instructors to run active hemorrhage scenarios without modifying the base simulator structure.
Step 3 Add Realistic Color and Blood FX
Blend the edges of the prosthetic using grease paint wheels or alcohol activated makeup palette colors. Match the tissue tones to reflect proper clinical conditions like bruising, ischemia, or infection. Finish by adding simulated blood or exudate to complete the visual presentation.
Fast Track Techniques for Busy Educators
When class schedules leave zero margin for delay, use these efficiency strategies to keep simulations moving smoothly:
- Use Strap On Overlays: Modular flash moulage can be strapped onto manikins or human actors in seconds, completely skipping adhesive dry times.
- Pre-Assemble Scenario Trays: Group all necessary prosthetics, fluids, and dressings into individual tubs labeled by scenario before the school day starts.
- Combine Actors with Manikins: Use human actors wearing wearable trauma vests for initial assessment and communication drills, then transition students to a task trainer for invasive procedures.
- Focus on Key Physical Cues: Prioritize high-value visual signs like active bleeding or deep tissue color changes rather than spending time on subtle cosmetic details.
Maintaining strong safety protocols for both instructors and student actors is essential during active physical drills. Educators can review institutional standards and wellness resources through the Daily Nurse Safety Tools and Training Guide to align simulation practices with broader clinical safety guidelines.
Cleaning, Maintenance, and Equipment Care
Proper maintenance doubles the lifespan of your simulation inventory and protects your capital investments.
- Clean Immediately After Use: Never leave fake blood or adhesives on manikins overnight. Wipe down surfaces right after debriefing sessions conclude.
- Use Approved Cleaning Agents: Wash silicone prosthetics and manikin skins with warm water and mild dish soap. Avoid harsh chemical solvents like acetone unless specifically recommended by the manufacturer.
- Dust with Powder Before Storage: After washing and drying silicone overlays, dust them lightly with cornstarch or setting powder to prevent sticky surfaces from adhering to each other.
- Store in Climate Controlled Areas: Keep all prosthetics and makeup kits in cool, dry storage cases away from direct sunlight to prevent warping and discoloration.
FAQs
What are the most essential trauma simulation supplies for a new sim lab?
A solid starter kit should include reusable silicone wound overlays, non-staining simulated blood concentrate, skin safe barrier gel, setting powder, and basic makeup wheels for bruising and burns.
How do I prevent fake blood from staining my simulation manikins?
Always apply a barrier gel or protective spray to the manikin skin before applying any fluids. Use specialized simulation blood concentrates designed specifically for manikin use rather than theatrical makeup or homemade dye recipes.
Can medical moulage be applied directly to standardized human actors?
Yes, provided you use skin safe, hypoallergenic makeup and medical grade adhesives. Always check for latex or silicone allergies before applying prosthetics to human participants.
How long does it take to apply pre-made flash moulage overlays?
Pre-made strap on overlays take less than two minutes to attach and connect to fluid systems, making them ideal for tight class schedules.